Showing posts with label Accessories. Show all posts

ONLY THE LONELY

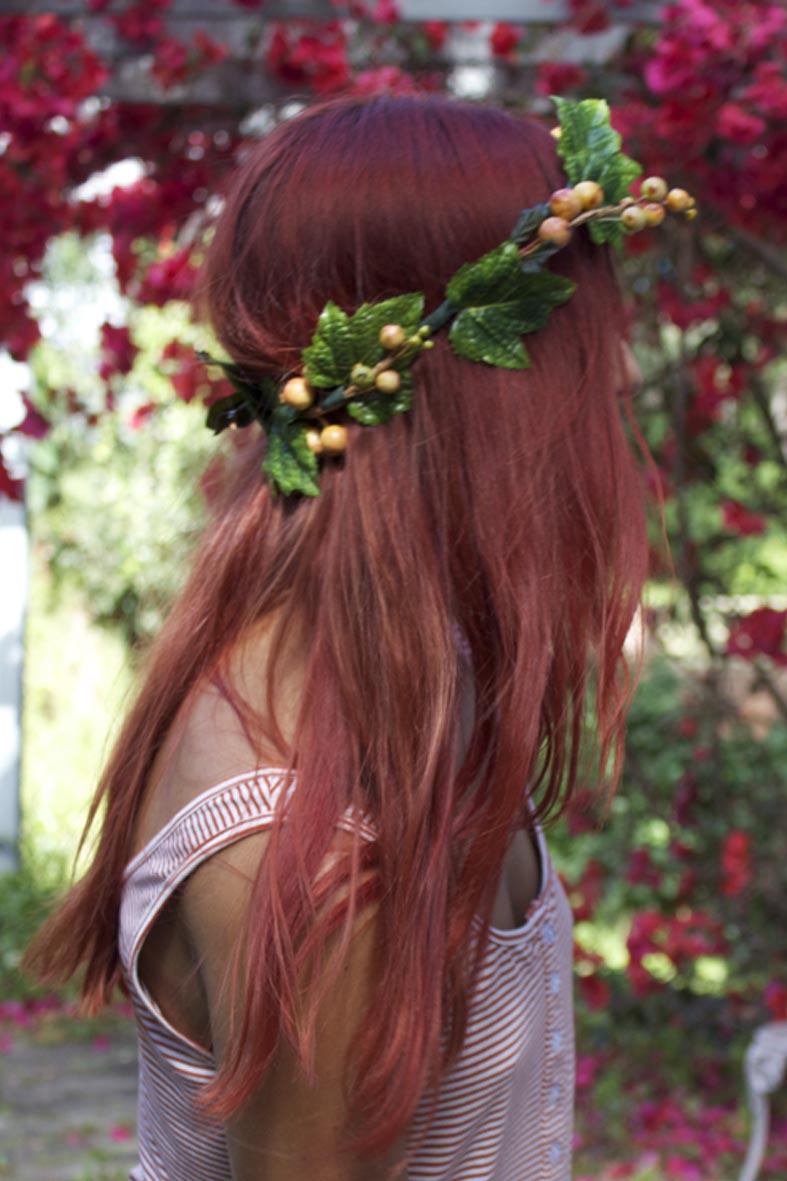
I stumbled across Only the Lonely on Facebook and had a quick chat to designer Angela Sterchele. I was not only taken back by the gorgeous, feminine designs but the 
photography was also beautiful, and recently a few pieces from the latest collection were featured in Oyster Magazine.

From Oyster Magazine
Can you give us all a little bit of your background?
My background is based strongly on following my dad around to art galleries and antique shops as a child. He is a freelance artist and that has been my biggest inspiration to follow my passion. I have studied at melbourne school of fashion in design and also business and knew from childhood I wanted to be in fashion and designing was always my passion and now I share my passion between design and styling.

Tell all of us a little about Only the Lonely.
Only the Lonely is named after an amazing and meaningful song by Roy Orbison that I listened to as a child. I wanted to create accessories by hand as I love making things from scratch. I began with my floral pieces before moving onto feathers, crystals, studs etc, which are going to be out in my new High Summer look book soon. I just simply wanted to create beautiful pieces that I would love to wear.

What kind of woman wears Only the Lonely?
The only the lonely girl is feminine, daring and loves a bit of attention and taking fashion risks. She can be a chamelion and wear what ever she feels.

What inspires you when you’re designing?
When I'm designing I try to use beautiful materials in a slightly edgy way to create something fresh. I like to create something dreamy and almost wearable costume pieces.

How would you define your personal style?
My personal style is totally eclectic. I love the crazy pieces that not many people would actually wear but i style them in my own wearable way. I dress for my mood and have to feel right or I will be late due to wardrobe changes. My car is a wardrobe on wheels which is handy.

What is the next step for Only the Lonely?
Only the Lonely is about to shoot it's first campaign which will showcase the Festival Collection '12' and is the first time that all the various styles will be shot together as a collection. I hope to pick up some more stockists this year and continue to stock at one of my favorite stores Hutch. The label is available through it's facebook page and often appears at Melbourne markets also.

You can find more of Only the Lonely here.


KILLEN FALLS


Wearing Zimmermann bikini

Sometimes it's nice to forget about the things that get us down in life and experience the true beauty of nature. This small series was shot by my boyfriend when we went for a swim at a place called Killen Falls while we were visiting Byron Bay. I researched a few waterfalls and this was one of the only ones that you could swim in. It was a bit of a treacherous walk off the beaten track but was so worth it once there, as you can tell from my frolicking pictures.


DIY FRIENDSHIP BRACELET


It seems that I have fallen off the face of the earth recently. I blame the holidays. Really, I was up at Byron Bay, had little reception where I was staying and so posting was difficult. I wanted to do one DIY post that could be done while holidaying and I decided that road trip time-passer would be really cool. Books, magazines, music, crosswords... So many fun things to do on the way. I decided to make a friendship bracelet on said road trip. It's easy and is an lovely addition to any arm-party. You'll need to prepare beforehand, so buy all of your bits and bobs prior to leaving.


You'll need:
- Several colours of embroidery thread
- Safety pins
- Pillow
- Scissors

How to:
1. This tutorial is for a Chevron pattern friendship bracelet. Cut your threads prior to leaving, then you won't need a measuring tape and your arm won't be in the face of the driver! Cut several of your colours to about 75 cm. I've used 6 colours, but you need two sets of each colour. Combine your threads and tie a knot at one end, leaving about 6 cm of slack.

2. Pin your knot to your cushion on your lap. Separate the two sets of colours in half making sure to arrange the colours in a mirrored pattern, so the outside colours are the same and so on towards the centre.

3. Starting on the left side with the outermost colour (purple in our picture) make a forward knot in the shape of a 4 over the second colour, loop it under and back through the opening. Then pull the thread you just looped up towards the right to tighten it. Repeat this knot twice over each colour. Keep repeating this until the outermost colour has reached the centre.
4. Now do the same on the right hand side with purple, and make a backwards knot, which is done using the same process except mirrored (make a backwards 4). Thread through until it reaches the centre. Then repeat step 3 and 4 with the next colour. Be sure that you're repeating the knot twice each time.

5. When you have about 6 cm left to go knot the end of the bracelet and then braid each end and knot once more. Done!

There are other patterns to make as well. For a straightforward striped bracelet, just cut one set of colors and knot the outermost color all the way through to the right side. For an asymmetrical chevron, mix up the colors when dividing them into 2 sets just make sure you count the number of strands as you knot so you know when to stop in the middle each time. Cute right? Would love to see if anyone else has tried this and any other variations.


BYRON BAY


For the past few days I've been soaking up the hot sun at Byron Bay. The boy and I were staying at this beautiful 300 acre farm stay property about 5 minutes out of Byron (with very bad reception as well) and I often forgot that's where we were. It was an amazing and peaceful place with rolling green hills, private lake, views, cows, goats and tranquility.
I couldn't pass up the chance to get a sneaky outfit post in while I was carefully strolling barefoot along the property.


Wearing: Shakuhachi lace jumpsuit, thrifted gold watch, friendship bracelets (tutorial coming in a few days)


CHRISTMAS DAY


What a day. I barely had time to enjoy lunch from running between my family to my boyfriends family and trying to get some sort of outfit together. I think I managed in the end and I did enjoy the day. I hope Santa was good to all of you. It was a very laid back Christmas for The Bearded Lady. Santa was kind enough to bring me these really cute hippie-style brown circular sunglasses by Mink Pink. I also got loads of comments on my DIY Christmas hair wreath. I think the best compliment I received was 'Christmas Fairy'. If you missed the tutorial you can find it here. I was also wearing my DIY fishtail hem skirt and if you haven't yet read that tutorial you can read it here.


Wearing: Christmas Hair Wreath, Mink Pink top & Sunnies, Fishtail Skirt, YSL ring, Xmas present silver bracelet, Orange/brown cork wedge heels


DIY CHRISTMAS HAIR WREATH


This year, I have admittedly been a little disheartened by Christmas. I normally love buying presents for my family, friends and the boy but I'm on a budget and haven't been able to go all out. Having said this, it doesn't mean I still can't bring a bit of style and Christmas cheer this coming Sunday.

If you love hair wreaths like daisy headbands and such then you'll love this DIY tutorial. It ain't no Christmas without a tissue paper crown from a Christmas cracker, but I'm going to don a cute DIY Christmas hair wreath.

You'll need:
- Floral wire
- Green floral tape
- Wire cutters (or some SERIOUSLY heavy duty scissors)
- Fake leaves and berries


How to:
1. Grab 2 pieces of the wire and cut them to the same length and make a circle. The wire I bought was shorter than the size of my head so no cutting was needed. Try it on and make sure it is semi-loose because all the things you attach and the tape take up room.


2. Starting at the part where the wire joins wrap one layer of floral tape around the entire circumference of the wreath.

Wrap floral tape around wire
3. Grab two leaves and cut them each about 1 inch from the stem. Cut a fairly long piece of floral tape and attach each leaf onto the wire in different directions. Then cut a small section of berries and do the same again.


To avoid looking like a Christmas decoration keep the leaves and berries very minimal. If you use too many it will look crowded and silly. I left about 3 - 5 cm space in between each leaf and berry stem attachment.
4. Once you have attached all of the pieces cut more floral tape and wrap any sections that may be loose.


And there you have it. Who said Christmas spirit couldn't be cute and trendy?