Showing posts with label Vintage. Show all posts

TWIST + WRAP TRIBAL PRINT DRESS

Today I've been preparing to go and look at a few fashion colleges in Sydney. That's right, obviously three years at university weren't enough and I want more study. Honestly, I think I'm crazy. Before I headed out though I wanted to try a really cute look that I found over at A Pair and a Spare. You can find her proper tutorial here, I have just done the end wrap part a bit differently. Basically, you cut off the bottom of a long skirt, hem the mini skirt, and with the bottom part you've cut off, cut it open so it's a long piece of fabric and then wrap and twist it around your bust starting at the back. I did mine a bit differently to what Geneva did and instead of tucking the ends into the waistband at the back, I crossed them at the back and then pulled them over my shoulders and pinned them under the bust to look like a bustier style. Simple! The fabric of my skirt was a weird stretchy one, which is why in the back picture it looks like it's sagging a little (it was hard to keep it pulled tight). I think I'll be doing this to a few of my long skirts that never get worn anymore. I think I even like the top just on its own. Thoughts?


See how the back sags a bit? Still, the cross back looks cool, what do you think?


BYRON BAY


For the past few days I've been soaking up the hot sun at Byron Bay. The boy and I were staying at this beautiful 300 acre farm stay property about 5 minutes out of Byron (with very bad reception as well) and I often forgot that's where we were. It was an amazing and peaceful place with rolling green hills, private lake, views, cows, goats and tranquility.
I couldn't pass up the chance to get a sneaky outfit post in while I was carefully strolling barefoot along the property.


Wearing: Shakuhachi lace jumpsuit, thrifted gold watch, friendship bracelets (tutorial coming in a few days)


DIY ZIMMERMANN [INSPIRED] MINI MAXI SKIRT


I started this project on the 12th of December and I was really optimistic and completely underestimated the task I was setting myself. I won't lie - I got up to the last step and had to put it down and walk away for an hour or so out of sheer frustration. An hour turned into 3 weeks. Alas, I have finally finished. I found this skirt at a charity store and I bought it for my trip to India. Not wanting to be one to succumb to the typical Jodhpur pants trend, yet not wanting to offend locals and wear mini skirts I decided to travel with a little style and loads of comfort and opted for maxi skirts and loose fitted cotton tops. I found this skirt for something like $8 and I loved the retro 70's style floral print. However it wasn't very well made to begin with as I was constantly hitching it up and tying knots in it while travelling due to it not fitting me properly and the elasticised waist band being nearly worn out.

So, inspired by a Zimmermann maxi skirt (pictured below) from their Halcyon Days SS 11/12 RTW collection, I decided to overhaul my skirt to emulate the style. This is probably the biggest makeover project I have ever taken on. My thoughts were that the skirt was pretty average anyway and anything that I did to it couldn't have been much worse. I just took my time and thought of the best way to tackle such an ambitious task. (Sorry for the lack of process photos I lost some of them along the way, so have given as detailed instructions as possible).

- One little side note, I was lucky enough to work doing backstage photography at a lot of designer shows during fashion week back in May and Zimmermann was the first show I went to. When I first saw this skirt I fell head over heels and it was a great way to start the week!


You'll need:
- Long floral maxi skirt OR floral fabric if you're making from scratch
- Sewing machine/needle and thread
- Pins
- Scissors
- White ribbon
- Invisible zipper (that matches the background colour of your skirt (mine was black)


How to:
1. I cut off the elasticised waistline. Then I grabbed my favourite bodycon skirt and took its measurements as it is a similar length to what I wanted the top fitted mini part of the skirt to look like. I measured the length (and added 2cm for hemming) and cut the skirt to this length (careful not to ruin the bottom section as I needed this later).
The original skirt; After cutting off the waistband and the bottom half.
2. Leaving the bottom half to the side for now, I then hemmed the top waistline section of the skirt, about 1cm thick.
3. I then had to work out how much to cut off so that the skirt fit me properly. I wanted the skirt to be high-waisted so took the measurements across my high-waisted bodycon skirt. The fabric of the floral skirt was not stretchy and I was afraid I wouldn't leave enough room for my hips so I really took my time on this part. Remember, it's better to cut less than too much!
4. Once I figured out the measurements of my waist and the hips I made the skirt the same width from hip to knee (see in the photo of the Zimmermann skirt how it seems to be quite a straight cut from the hips down).
5. Sew in an invisible zipper to one side.
6. I made sure it was all good and fitted everywhere. If you're attempting this project, make sure that the fitted part sits flush everywhere. If any parts need to be taken in even more then now is the time to do it. I then sewed another hem at the bottom (I decided against attempting the triangular hem).
7. Now back to the bottom half that I cut off earlier. This part is going to be the floaty section. I cut the bottom of the skirt into four even sections lengthways and then hemmed each one.
8. I pinned each section onto the inside of the skirt, about 10cm from the bottom and then sewed them all down.
9. Sewing the white ribbon on to give the structured look was the most fiddly and time consuming process. I feel like it paid off though.


Conveying a sense of movement with the floaty sections - apologies for lack of styling!


DIY GLITTER HEELS


Has anyone noticed that fashion has taken an explosive turn to glitter of late? Miu Miu and Christian Louboutin are just two of many designers who have gone disco and turned glitter to heels (among other things) and I'm sure by now you have all seen this trend bleeding out into local shoe shops everywhere. However, the more budget friendly brands are still quite a bit considering these are a TOTAL 'it' item, and being on a budget this Christmas I'm really not prepared to fork out much on this style (even though I'm a little obsessed) when I know I can make it myself.

Miu Miu

Miu Miu


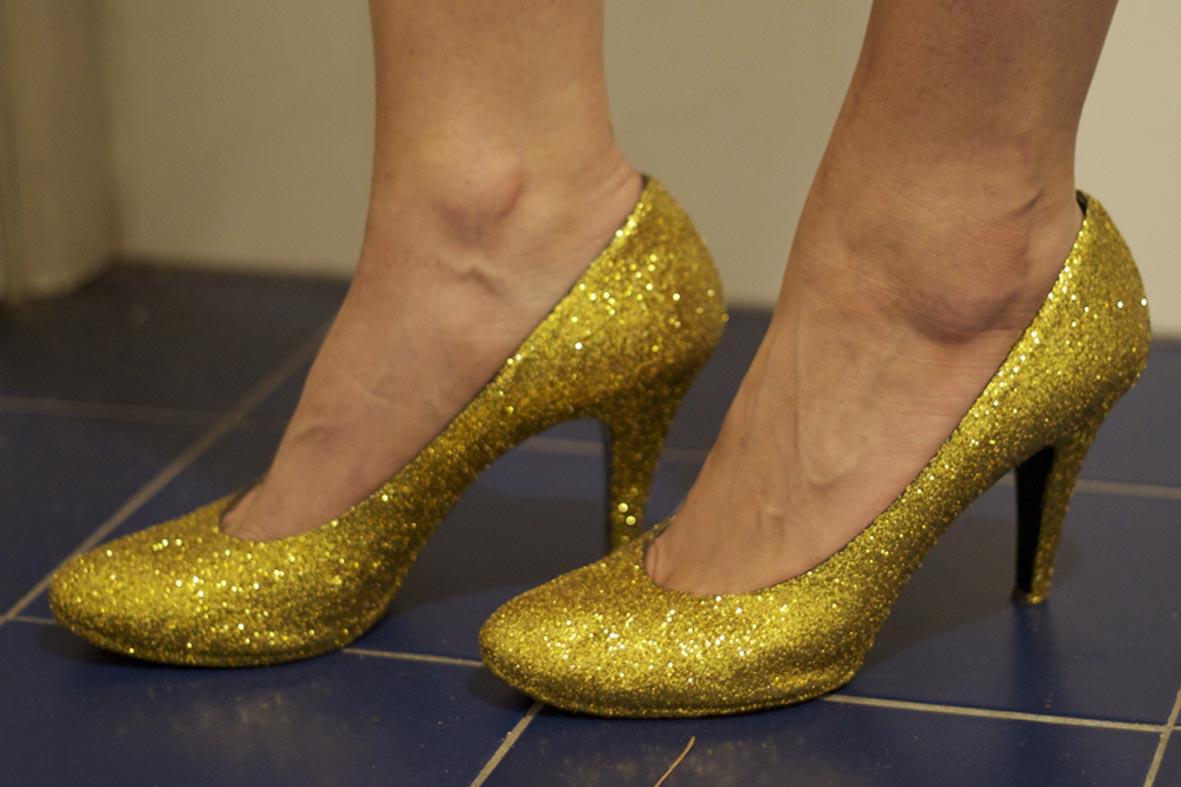
So, as part of Tightass Tuesday, I decided to get my DIY on hard and make a pair of my own glitter heels. All up they cost a grand total of $12 to make. Honestly.

You'll need:
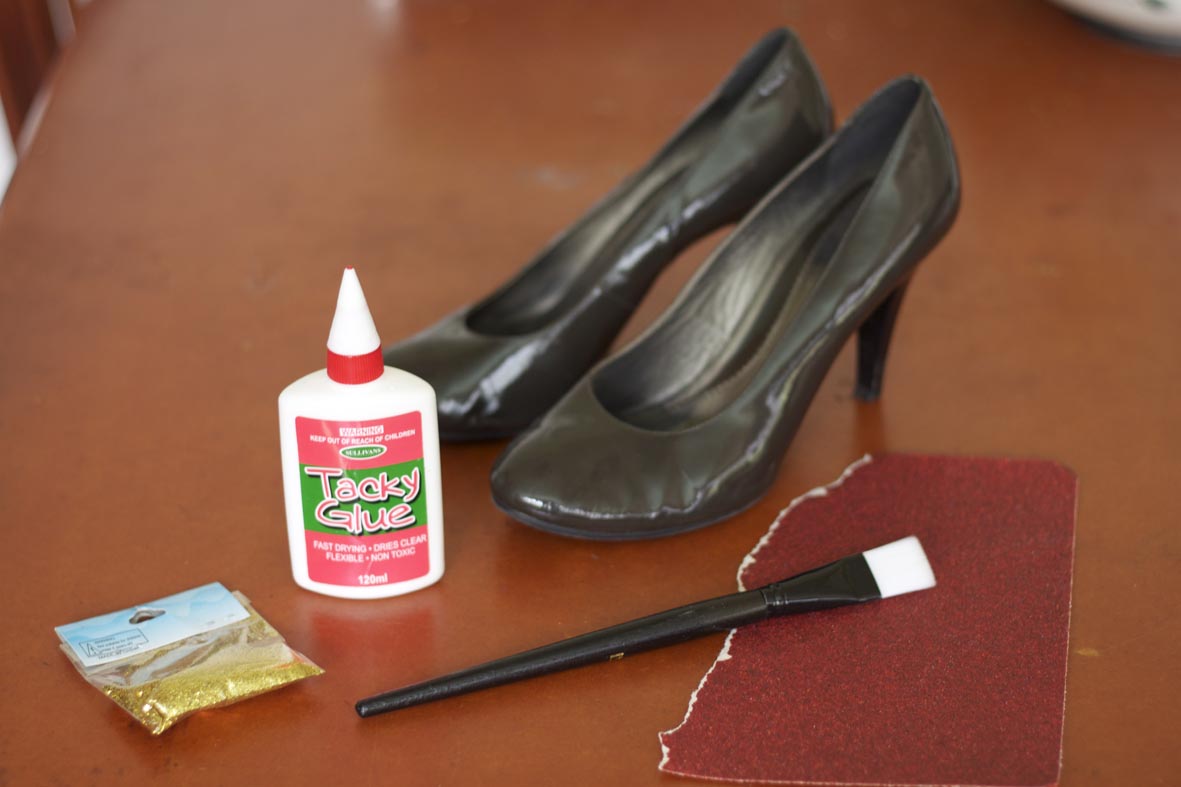
- Old heels or a thrifted pair. Mine were $4 from Salvo's, a steal (although they were pretty hideous).
- Glitter. I bought two sachets at a Discount store for $1 per sachet. (I really wanted rose gold but at Lincraft they were $4.50 per sachet and I needed 3!)
- Sandpaper
- Craft glue (one that dries clear)
- Paintbrush


How to do it:
1. Get your pair of thrifted shoes and sand them with your sandpaper. This is so the glue will hold well.
2. Mix 1 sachet of glitter with your glue. The brand of glue that I bought was 120mL and that was more than enough to cover both shoes. I also mixed a little water with the glue so it wasn't so thick.


3. Mix the glue and glitter together well and then start painting the heels all over with the glue (on newspaper of course).


4. Once the shoe is completely covered with the glue mixture open the second sachet of glitter and sprinkle it all over. If you like you can put a container underneath to catch any glitter that doesn't stick. Make sure you cover all sections. I needed to go over the heel part twice as there were parts I had missed.

Glitter on the inside can be removed later
5. Repeat steps 3 and 4 for the other heel.
6. Leave heels to dry overnight for best results.


And there you have it. How long did it take? The entire duration of The Lion King. The only problem I have found so far is that even when the glitter had completely dried it was still shedding all over the place. I think I'll buy a spray adhesive and see if that will keep the glitter in place. I'll get back to you on that one. I'll definitely be featuring these cuties in an outfit post soon. Happy Tightass Tuesday!

UPDATE: I bought some spray adhesive and coated it on to the heels and it worked a treat! No need to over-spray. Just a light coating and the glitter should stay on fine.


OH THE TIMES THEY ARE A-CHANGIN'


I have a straight-up confession: I've been extremely lazy and wracked with guilt about not having done a blog post in about 3 weeks. I've been working myself into the ground trying to get things organised for the online store which I'm hoping will be up and running in the next two to three weeks. 

I've been altering clothes, designing the site and have also somehow managed to find the time to hand in final uni assignments, juggle two jobs AND a relationship. No wonder I've got big bags under my eyes! But the times really are a-changin, for me at least. In the past week I've finished uni, left one of my jobs and am about to start my own business. Crazy.

With the look above, I struggled a bit. I haven't done a blog post in a while and wasn't feeling entirely ready or comfortable with what I was wearing so please excuse the half commitment to the photos. I'm wearing a midriff top that I altered a few days ago. Beforehand, it was really long and daggy but now it's lovely, floaty and cute and will be available to buy online. The shorts are just a pair of old faithfuls I bought earlier in the year. Oh and the clogs? Absolute head over heels in love with them. I bought them from my friends store +Estate of Mind in Surry Hills and they're wicked. I'm pretty sure I'll be using these babies in a few future blog posts. 

So now that uni is done and more time will be dedicated to launching and running the website, I think I can say with confidence that there'll be loads more posts and looks to come from this day forward. 

Follow the Yellow Brick Road


Although this dress doesn't really mirror my regular style, it's pretty darn cute.  I just wanted to try it on as I bought it for the shop but then I got a little carried away and wanted to write a post about it. It's a vintage H&M dress, but here's the catch: it's actually a children's dress. It's a bit tight around the sleeves and definitely needs a bit of altering, but is pretty loose fitting everywhere else (a size 6 - 8) and WILL be for sale in the store. I stupidly didn't take a photo without the bow tie, but the collar is a curved Peter Pan collar, so feminine but the bow isn't a part of the dress. 


I also love these vintage 70's sunglasses I bought a few years ago. They're so Lennon. I think this dress would also be really cool teamed with a pair of Doc's or biker boots, to give it a cool edge and break up the childishness of the dress. If you like this look make sure you Hype it on Lookbook here.
_


What Goes Around Comes Around

Occasionally when The Bearded Lady is rummaging for vintage finds for the exciting online store opening soon, I'll come across something so gorgeous, so inspiring yet so simple that it kind of gives me chills. It's a reminder as to why I am opening the store and why I love vintage clothing so much. Amongst the tons and tons of junk there really are some amazing finds.

This navy blue sheer piece is what I am drooling about. Is it a top? Is it a cape? Is it a jacket? I don't know... but it's beautiful. As you can see it just ties up at the front. One of the things about vintage clothing that is so outstanding is that fashion really does repeat itself. This piece could be found new in any store today and is still so modern, it's versatile because it can be dressed up or down. Okay, now I'm rambling... a clear sign that I'm in love. I know that I've found a real treasure when I'm torn about keeping an item or selling it in the shop. Don't fret, I've already decided to sell it, and The Bearded Lady is planning on reproducing these in different one-off vintage fabrics and a range of sizes. Keep your eyes peeled for these beauties.

Also featured in this post is the white vintage crushed crepe dress, which will also be available for sale in the store, along with a new pair of 70s inspired cork wedges that I bought recently. Not usually a fan of cork, but I really think it works with these babies. Oh and I'm also wearing my favourite fluro orange ToyWatch.


Stripe That Smile Off Your Face


I've always had a bit of a crush on stripes. They always seem to be one of those things that come back in style every few years, lucky for me. On the right piece of clothing stripes can be really flattering and I have always believed that stripes work best on loose fitting garments, as they don't draw attention to any unwanted curves we all may have and don't optically trick people into thinking we are bigger than we really are. 

Here I am wearing a top that was originally long sleeved, tucked into vintage Levi black denim jeans cut into shorts, with a tan high waisted belt, red hat (for the bad hair day) and white cutout lace up boots. 

Stripes work best when they're the feature of an outfit, so don't go too crazy with accessories and other crazy patterns, because more often than not it won't work. Keep it simple with stripes and the look will work for itself.

These shorts will be available for sale from The Bearded Lady online store, coming soon.

Thursday Tea Party


Thursday is a good day of the week. It's almost the weekend, it's so close you can almost taste it. The Bearded Lady was feeling a little girly this morning and channelled this with a lace dress, faux fur vest and socks with heels. Win.

Wild at Heart


Today The Bearded Lady woke up feeling a little wild. This is nothing unusual, but today I thought I'd actually channel that wildness and throw on a vintage Nookie animal print top, with maxi skirt and Jeffrey Campbell Ad Long's. It's going to be a good day.

This top will be available in store soon!


Saturday Morning

 
What better way to start the weekend than by getting a little dressed up for a coffee and breakfast on a Saturday morning. After my sister and I visited the Armchair Collective cafe in Mona Vale, we took my red hair and red lips for a few snaps. Perfect Spring day.

Since this is the first blog post I felt that I had to wear something that resembled a beard. Hence, the scarf. 

What is The Bearded Lady wearing?

Vintage Beige Blazer
Vintage Topshop Sheep wool scarf
Vintage Beige mesh top
Black Nudie Jeans
YSL ring
Neon Orange ToyWatch (LOVE!)
Gold watch


Oh, and just in case I forgot what time it was today, I decided to wear two clashing watches.