Showing posts with label 2011. Show all posts

DIY ZIMMERMANN [INSPIRED] MINI MAXI SKIRT


I started this project on the 12th of December and I was really optimistic and completely underestimated the task I was setting myself. I won't lie - I got up to the last step and had to put it down and walk away for an hour or so out of sheer frustration. An hour turned into 3 weeks. Alas, I have finally finished. I found this skirt at a charity store and I bought it for my trip to India. Not wanting to be one to succumb to the typical Jodhpur pants trend, yet not wanting to offend locals and wear mini skirts I decided to travel with a little style and loads of comfort and opted for maxi skirts and loose fitted cotton tops. I found this skirt for something like $8 and I loved the retro 70's style floral print. However it wasn't very well made to begin with as I was constantly hitching it up and tying knots in it while travelling due to it not fitting me properly and the elasticised waist band being nearly worn out.

So, inspired by a Zimmermann maxi skirt (pictured below) from their Halcyon Days SS 11/12 RTW collection, I decided to overhaul my skirt to emulate the style. This is probably the biggest makeover project I have ever taken on. My thoughts were that the skirt was pretty average anyway and anything that I did to it couldn't have been much worse. I just took my time and thought of the best way to tackle such an ambitious task. (Sorry for the lack of process photos I lost some of them along the way, so have given as detailed instructions as possible).

- One little side note, I was lucky enough to work doing backstage photography at a lot of designer shows during fashion week back in May and Zimmermann was the first show I went to. When I first saw this skirt I fell head over heels and it was a great way to start the week!


You'll need:
- Long floral maxi skirt OR floral fabric if you're making from scratch
- Sewing machine/needle and thread
- Pins
- Scissors
- White ribbon
- Invisible zipper (that matches the background colour of your skirt (mine was black)


How to:
1. I cut off the elasticised waistline. Then I grabbed my favourite bodycon skirt and took its measurements as it is a similar length to what I wanted the top fitted mini part of the skirt to look like. I measured the length (and added 2cm for hemming) and cut the skirt to this length (careful not to ruin the bottom section as I needed this later).
The original skirt; After cutting off the waistband and the bottom half.
2. Leaving the bottom half to the side for now, I then hemmed the top waistline section of the skirt, about 1cm thick.
3. I then had to work out how much to cut off so that the skirt fit me properly. I wanted the skirt to be high-waisted so took the measurements across my high-waisted bodycon skirt. The fabric of the floral skirt was not stretchy and I was afraid I wouldn't leave enough room for my hips so I really took my time on this part. Remember, it's better to cut less than too much!
4. Once I figured out the measurements of my waist and the hips I made the skirt the same width from hip to knee (see in the photo of the Zimmermann skirt how it seems to be quite a straight cut from the hips down).
5. Sew in an invisible zipper to one side.
6. I made sure it was all good and fitted everywhere. If you're attempting this project, make sure that the fitted part sits flush everywhere. If any parts need to be taken in even more then now is the time to do it. I then sewed another hem at the bottom (I decided against attempting the triangular hem).
7. Now back to the bottom half that I cut off earlier. This part is going to be the floaty section. I cut the bottom of the skirt into four even sections lengthways and then hemmed each one.
8. I pinned each section onto the inside of the skirt, about 10cm from the bottom and then sewed them all down.
9. Sewing the white ribbon on to give the structured look was the most fiddly and time consuming process. I feel like it paid off though.


Conveying a sense of movement with the floaty sections - apologies for lack of styling!


DIY [SASS & BIDE] DRAPED FABRIC DRESS

New Years Eve is fast approaching and I have nothing to wear. Well, not nothing per se, but most girls know what I mean when I say that. I was wondering what I could do about my outfit since my plans are still not yet decided and Sydney isn't seeming so desirable this New Years with drinking bans in certain areas and loads of pubs closing early. I was browsing the internet when I came across a dress on the Sass and Bide website that I saw a few months ago that got my DIY juices pumping and decided that it would be my next project and my NYE outfit.


I love the simplicity of this dress from the Sass & Bide 'Seekerstate' collection. I love its sweeping, ethereal and modern look and the way the dress has been styled in the second picture with the fabric bunched closely together and I think that is how I will end up styling my piece.

At the fabric store I wanted to find a nice, sheer, sweeping neon material like the kind used on the dress. I couldn't find anything neon but would you believe what I found instead? A pink and purple ombre chiffon fabric on special for $11.50 per metre? In case you haven't been following my ombre endeavours of late I recently did a how-to on ombre denim here and a few days ago I did a balayage/ombre experiment on my hair, which you can find here. Clearly ombre is a theme for me at the moment, and I had a little chuckle when I saw the fabric at the store while thinking 'what are the odds?'. So in keeping with my ombre obsession I thought it might be a nice interpretation of the Sass and Bide dress, which any of you can easily throw together as well. Follow me...

You'll need:
- 2 metres sheer draping fabric - mine is polyester but silk would also be nice
- Pins
- Sewing machine/needle and thread
- Scissors
- A white dress with a higher neckline would work better than low-cuts


How to:
1. Hem both selvedges (edge of a fabric that is woven tightly so that it will not fray) of your fabric by folding it once, ironing and folding again, ironing and stitching with your needle and thread or sewing machine.


2. Pin both sewn selvedges to the top of the collar line and do your gathering from this section so you can see how much needs to be gathered as you're doing it.


Run a needle and knotted thread across from one side to the other, doing stitches about 2-3cm apart. When you reach the end rehang your dress on a hanger and gather by pulling the end of the thread through. When you think the fabric has been gathered enough tie a knot in the thread and then unpin fabric.

Needle and thread through from one side to the other; gather by pulling.
3. Lay the dress flat on a table (normal side out) and then lay your fabric with the wrong side facing up and place it upside down with the gathers at the bottom (like picture). Lay the corners of the gathered fabric around the neckline and pin it down. Make sure that if you have used a thread that is visible that you pin ABOVE it so that when you flip the fabric after stitching it down it won't be seen. Flip the fabric and check it to see how it looks (picture 3). Stitch as close to the hem of the collar so that the fabric looks like it is sewn from the very top.

Step 3
4. Flip your fabric over and make sure to sew up any loose little sections that may be hanging out and to also cut any visible extra fabric from the part underneath.
5. Finally hem the bottom of the fabric either by hand or sewing machine.


Done! You'll need to fiddle around with how it sits when you place a belt on. So that's my NYE outfit sorted now. Word for the wise: anyone who is wanting to try this I feel it's necessary to say that this project took a few hours as it was fiddly. But the end result was worth it. I'll be doing a proper outfit post of my look tomorrow.


DIY BALAYAGE OMBRE HAIR HIGHLIGHTS


Have you a few hours to spare? Like 2-3 hours, I mean? Low maintenance hair is what I'm all about, which may sound strange coming from someone who has bright red hair. This look has been around for ages but it's still really on trend. I have been trying to distinguish the difference between the terms balayage and ombre and I think I have it figured: balayage is a free form hand-painted highlighting technique for hair done with a brush (I suppose this is compared to using foils) and is used to achieve an ombre look, which is French for shaded/shading and is basically a gradual lightening of the hair from the roots. The Ombre is usually done from the chin downwards and can be done with dramatic or very natural effects.

There are a few blogs that have shown how to do it, so I thought I'd give it a go considering my hair is dyed bright red. Would it work? Would it fail? I wasn't sure, but I thought the ombre effect could be really cool and different with red.

If you're trying this and your hair has no dye on it then bleach should take quite well and developing times may differ to the ones I used, in which case there are other blog posts on this topic which you can find on google. I use red hair dye and if you do have any other colour on your hair then I would suggest doing some research before trying it to see how to get bleach to take to your hair and if any stripping is needed. It might be more hassle and may be best left to your hair dresser.

You'll need:
- A bleaching/highlighting kit. Using a blonde hair colour simply won't work, you need to buy bleach kits. I bought L'oreal Perfect Blonde highlighting kit for about $20
- Towel (optional)


How to:
1. Mix together the contents of the packet according to the instructions. Grab a small section of your hair (underneath section) and do a strand test. This is optional but recommended especially if you're dying over another hair colour. I did my first strand test for 15 minutes and when washed away there was no change at all. With the second strand test I grabbed a different section from underneath and left the dye on for 40-45 mins and this result was much better (pictured).

Results from second strand test
2. Split hair in two down the back and tie. Decide where you want the ombre colour to start fading in. I chose to have mine just below the chin. I then spread the the blonde dye over my hair from the chin down, as I needed to lighten/strip the hair before doing the ombre technique. I left it for 30-35 minutes, washed it off then blow dried it.

Lightening process for 30 mins - applied from chin to ends all at once
After the lightening process - the blonde streak is from the strand test. I was careful not to put too much bleach on it during the next steps for an even result
3. Now for the ombre effect. I applied colour in 3 sections starting from the bottom and working up. I applied dye to the bottom 7-10cm of my hair and left it for 20-25 minutes. Leaving that, I then applied another part of blonde to the next 5-10cm of the hair and left it for 15 minutes. I then added the final amounts of dye to the last 5ish cm of the hair closest to my chin and left it for 10 minutes. I also spread the dye a little unevenly around the top 'root' part to avoid a definitive line from appearing and to help the blonde blend subtly. So the bottom part of the hair had dye on for a total of around 40 minutes, the middle part for about 20-25 minutes and the top, lightest, part for 10-15 (max) minutes.


4. Wash your hair out completely and use any additional shampoo or conditioners that come with the hair dyes and blow dry.


Ombre. Say it with me now - ohm-bray. Pretty cool. I'm really happy with the result and it wasn't difficult at all, just took a fair amount of time. Not sure how long I'll keep it but it has definitely given my red look a breath of fresh air. Hope you all like it.

Note: If you can, maybe get someone to help you. If you're doing it by yourself it's hard to get the back properly when its parted to the sides. I missed a bit at the back so might get someone to help me when I do it again in a week or two.On the other hand, I guess it does look more naturally faded. I like it, either way.

If you have questions about how to do ombre please contact me and I can try to give as much information about it as I know.


CHRISTMAS DAY


What a day. I barely had time to enjoy lunch from running between my family to my boyfriends family and trying to get some sort of outfit together. I think I managed in the end and I did enjoy the day. I hope Santa was good to all of you. It was a very laid back Christmas for The Bearded Lady. Santa was kind enough to bring me these really cute hippie-style brown circular sunglasses by Mink Pink. I also got loads of comments on my DIY Christmas hair wreath. I think the best compliment I received was 'Christmas Fairy'. If you missed the tutorial you can find it here. I was also wearing my DIY fishtail hem skirt and if you haven't yet read that tutorial you can read it here.


Wearing: Christmas Hair Wreath, Mink Pink top & Sunnies, Fishtail Skirt, YSL ring, Xmas present silver bracelet, Orange/brown cork wedge heels


DIY FISHTAIL HEM SKIRT

 
I've been trying to figure out what on earth I'll wear for Christmas day. I want something stylish, festive, budget-friendly and comfortable and I think I have the answer. All that needs to happen is for the skirt I want to wear to be overhauled. I am going to show you all how to sew a fishtail hem skirt from a boring old one you may have (apologies for the dodgy pictures, it was so late at night!)

You'll need:
- An old long skirt
- Scissors
- Sewing machine or needle and thread
- Iron

How to do it:


1. Try your skirt on and figure out where you want the shortest part to be at the front and make a mark. Add another 2-3 cm for hem allowance.
2. Take the skirt off and fold the skirt EXACTLY in half from the front and back. So instead of the back and front sides of the skirt next to each other the sides are next to each other. The skirt I am using has a drawstring front so I was able to determine where the fold was supposed to be.


3. Lay the skirt on the floor and cut from the front part of the skirt - cut the line fairly straight for about 30 cm as this will be the mini skirt section, then tapering down the back and bottom of the skirt. Try the skirt on once you have done this and make sure you've cut enough out. If you do need to cut more be careful not to cut away too much! (The skirt I used was quite a full maxi skirt, meaning a lot of fabric. When I cut it the section that tapers down was quite dramatic and I wanted a more subtle curve so had to play around with it a bit). I can't emphasise enough to cut out less to begin with in case you need to cut more.


4. Now fold the hem over twice and iron it down. Then pin the hem all the way around.
5. Using either your sewing machine or a needle and thread sew a small stitch around the hem.
6. Iron it once more.

Done. Instantly chic.


I promise I will do another post with my FULL Christmas outfit on in the next few days. I'm a bit busy enjoying the sun right now (which explains my bare feet!).


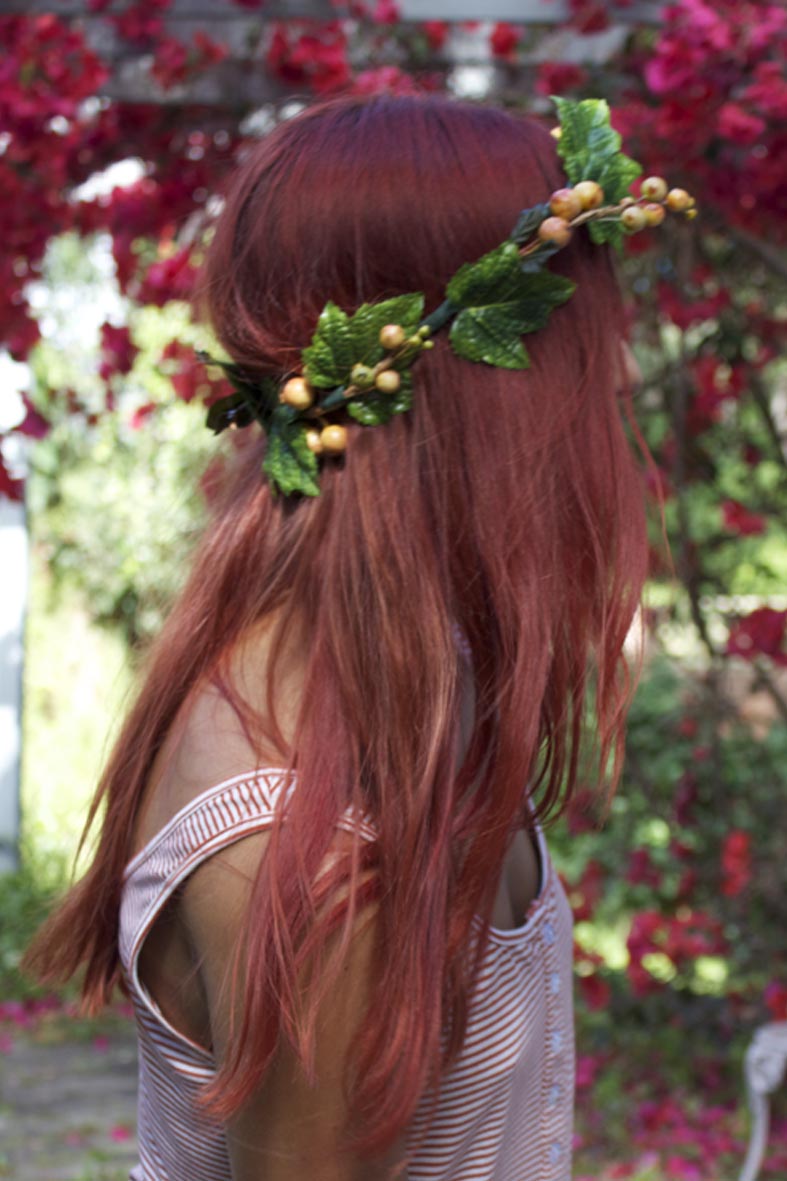
DIY CHRISTMAS HAIR WREATH


This year, I have admittedly been a little disheartened by Christmas. I normally love buying presents for my family, friends and the boy but I'm on a budget and haven't been able to go all out. Having said this, it doesn't mean I still can't bring a bit of style and Christmas cheer this coming Sunday.

If you love hair wreaths like daisy headbands and such then you'll love this DIY tutorial. It ain't no Christmas without a tissue paper crown from a Christmas cracker, but I'm going to don a cute DIY Christmas hair wreath.

You'll need:
- Floral wire
- Green floral tape
- Wire cutters (or some SERIOUSLY heavy duty scissors)
- Fake leaves and berries


How to:
1. Grab 2 pieces of the wire and cut them to the same length and make a circle. The wire I bought was shorter than the size of my head so no cutting was needed. Try it on and make sure it is semi-loose because all the things you attach and the tape take up room.


2. Starting at the part where the wire joins wrap one layer of floral tape around the entire circumference of the wreath.

Wrap floral tape around wire
3. Grab two leaves and cut them each about 1 inch from the stem. Cut a fairly long piece of floral tape and attach each leaf onto the wire in different directions. Then cut a small section of berries and do the same again.


To avoid looking like a Christmas decoration keep the leaves and berries very minimal. If you use too many it will look crowded and silly. I left about 3 - 5 cm space in between each leaf and berry stem attachment.
4. Once you have attached all of the pieces cut more floral tape and wrap any sections that may be loose.


And there you have it. Who said Christmas spirit couldn't be cute and trendy?


DIY MAGAZINE CHRISTMAS TREE


With Christmas quite literally around the corner I thought I'd throw together a DIY project that I remember my mum trying when I was a lot younger. While the whole idea may seem a bit naff, if you decorate it, it could make the perfect table centre piece around your turkey and ham. And I know I keep whinging about the weather in Sydney, but at the moment wearing cardigans in the thick of summer seems outrageous! This DIY is perfect for the dreary rainy days spent inside when you're NOT bathing in the sun.

You'll need:
- Old magazine. A thicker one works the best (I used an old Vogue)
- PVA glue
- Paint brush
- Spray Paint (optional)
- Glitter (optional)


How to do it:
1. Get your old magazine and rip off the front and back covers. A thicker magazine works best because it thickens the tree once its finished.
2. Starting from the front, fold the the page diagonally inwards to the spine and flatten.

Step 2
3. Take the corner of the fold and fold it inwards again. To make the tree even take the corner of the fold to the bottom corner of the spine and flatten the fold. Fold the extra triangle upwards so that the bottom is flat.

Step 3
4. Repeat these steps for the entire magazine.

Fold the little flap upawards. Repeat throughout.
5. The hardest part is to get the front and back to stick together and look even. Firstly mount your tree on something (I used the spray paint lid) so that the pages don't curl or bend from the bottom. Then get your PVA glue and paint brush and paste them together. I also pasted every second or third page together around the front and back section to even it out. I then used my spray adhesive from my Glitter Heels tutorial to keep all the pages in place.


6. This step is optional but I do recommend it. Spray paint your tree. I tried neon orange first, but didn't like it because you could see the print through it. So I went over it a few times with white spray paint. You can also add a star to the top as decoration. If you add glitter just paint a light coating of PVA over the tree and sprinkle the glitter all over.
7. When placed on your table I'd again mount the tree so it looks like it is slightly raised. I used a circular cooling wire.


Lovely, right? I had these little decorative presents and scattered them underneath.