As you all may or may not know, I love midriff tops. I'm well aware that it isn't a look that all feel comfortable wearing, however it's one that I've always been a big fan of, because I love high-waisted bottoms. As I have been trawling through many of the latest Spring Summer designer collections, a traditional bandeau/bustier midriff trend has been seen through quite a few collections, most notably Dolce & Gabbana, Yves Saint Laurent and Prada. It's a mixture of traditional busty 1940's styles and strappy 1970's looks and I'm loving them all.
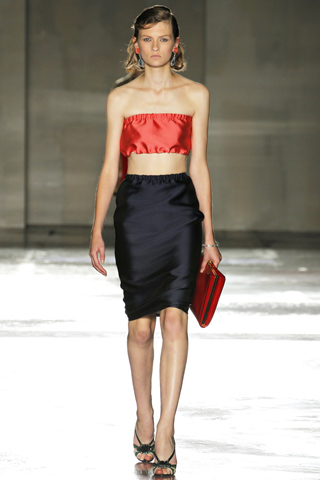 |
| Prada |
 | ||
| Yves Saint Laurent |
 |
| Dolce & Gabbana |
While I love the small straight styles, the Prada bandeau's in particular are super cute because of the puffy style and today I am going to show you all how to make one, as they're easy and a bit of a different spin on the style.
What you'll need

- Enough fabric for your measurements - I bought a silk dupion fabric, which was $39.95 a metre, but I purchased 30cm, which was definitely enough for me. I chose this fabric because it's quite stiff.
- 2m of elastic
- Invisible thread (or same colour as fabric)
- Scissors
- Pins
- Tape measure
How to do it
1. Measure around the widest part of your bust. I added an extra 10cm to this to leave enough fabric to make the bandeau puffy (but not OVERLY puffy) then cut any extra off. Then measure the fabric lengthways, as it is harder to do this when the elastic has been sewn in. I measured my bandeau for about 18 - 20cm in length, which leaves about 3 - 4cm for when you come to fold the elastic later.
2. Get your elastic and pull it from one end of the fabric to the other, holding it as taut as possible (I didn't do this at the beginning and had to unpick and resew it again because I hadn't pulled it tight enough, so there wasn't enough stretch). Cut the amount of elastic that is needed plus an extra centimetre at each end so you can hold onto it and stretch it while sewing it.
3. Starting from one end's edge, sew the elastic on and do a quick reverse stitch. Then start sewing the elastic all the way down to the end, holding it as taut as possible the entire time. This is to create as much elasticity as possible. Because I was doing such a long piece of elastic on fabric I did the stretching in sections - I'd stretch a bit out, sew it, then stretch the next bit out, sew it etc. When you reach the end finish it with another reverse stitch. You can trim the frays off, but it isn't necessary as we are folding them underneath.
 |
| Start at one end edge and make sure to be holding the elastic taut as you sew. |
5. Repeat from steps 3 - 4 for the other side of the fabric.
 |
| This is how it should look when you have folded and sewn the elastic down |
6. This next step is not necessary but if you have an overlocker you may want to sew the two length ends to neaten up the fraying edges. If you don't have an overlocker the bandeau can still work, so don't worry!
 |
| Having an overlocker isn't a necessity, but it makes edges neater. |
Oh, and in addition I was considering putting an invisible zipper in to avoid ripping it in case it didn't fit over my head and shoulders. It's an option but I don't think it's a necessary one. I've never had a big bust so wouldn't know, but fitting a zipper in could be a better idea for fuller busted girls. If you do use an invisible zipper, the only step that would change would be 7, where you would sew in the zipper at this stage.
And voila!
 |
| A bit too long... |
 |
| Fixed! Super cute, and easy. |
 |
| Puffy love! Nice and bright for summer. |
Love, The Bearded Lady
P.S. I'm sick today, so no facial shots. Always thinking of you guys. Also, I'm aware that my tights don't go but I was too excited to get my post up so apologies for the lack of styling effort xxx
Cool post!!
ReplyDelete